
Guide
First Adult Tricycle Buying Guide
Choose your first adult tricycle by checking rider fit, storage, weight limits, gears, brakes, assembly, and service before buying.
We research everything we recommend. When you buy through our links, we may earn a commission. Learn more
Guide
A front fairing can change the way a recumbent rider experiences weather, but it also adds a structure around the vehicle and rider. Compatibility.

Updated · 11 min read
A front fairing can change the way a recumbent rider experiences weather, but it also adds a structure around the vehicle and rider. Compatibility includes the trike model, drivetrain, steering, mounting, access, lights, and storage routine. A clear panel shown on one recumbent is not evidence that it can be attached to another with a few generic clamps.
This guide helps prepare a fairing purchase and installation inquiry. It is not a design for a homemade shield, a universal mounting procedure, or a promise of aerodynamic or weather performance. Follow the exact fairing and vehicle instructions, including model and revision restrictions. If the supported combination cannot be established, do not let a broad claim that it fits recumbents replace the missing approval.
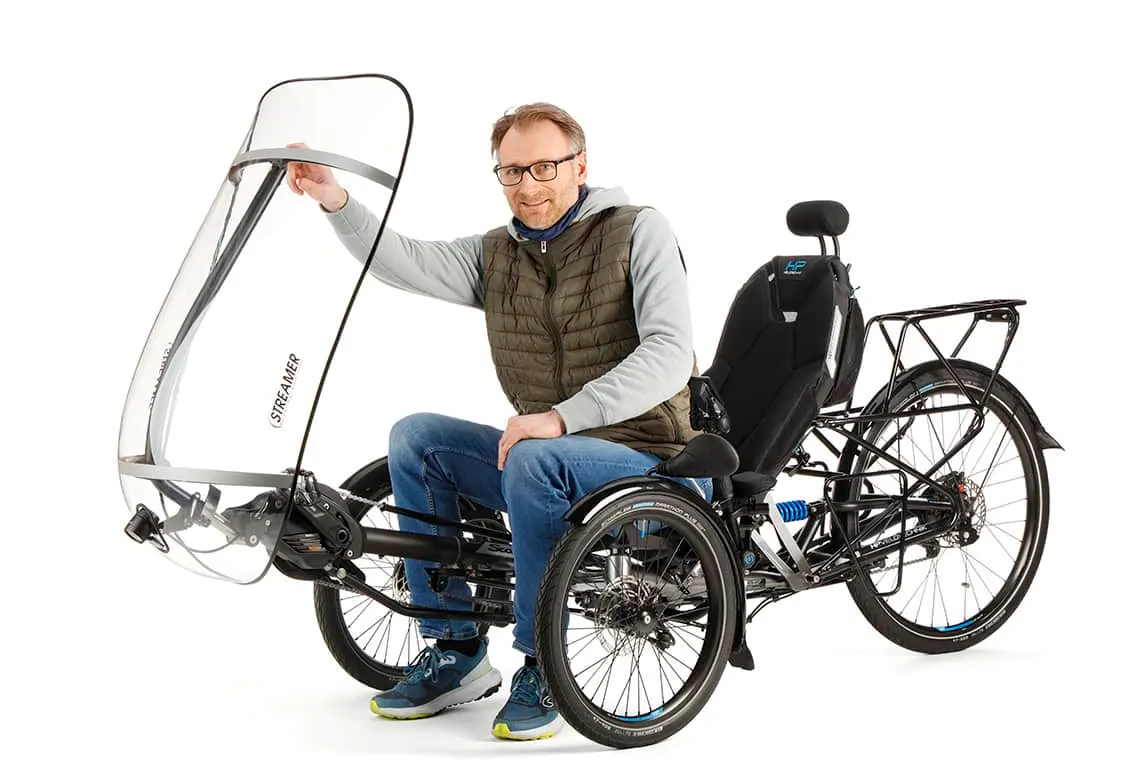
Record the product name, version, mounting kit, and the vehicle configurations the maker supports. Fairings can change over time, and an older manual may describe different equipment from a current product page. A used shield without its model identity or mount information needs investigation before installation.
HP Velotechnik's Streamer material is a useful manufacturer example of a front fairing with specific compatibility information. Its current page and the relevant manual should be read together. The example does not establish that every fairing fits every HP model, every drivetrain option, or recumbents from other makers.
Keep the document revision and support response in the ownership file. A saved image alone does not preserve the mounting requirements. If the seller cannot identify which generation is offered, resolve that before buying a panel and hoping the missing hardware can be found later.
A front fairing and an overhead canopy can address different parts of weather exposure and use different structures. Do not assume the terms describe interchangeable equipment. The canopy guide covers overhead systems. Combining accessories creates another compatibility question rather than automatically providing complete weather protection.
Define what you want from the fairing: a documented reduction in exposure within its intended use, a particular riding routine, or another specific need. Read the maker's claims with their conditions. This guide does not measure drag, speed, warmth, dryness, or energy savings, and it does not promise that a shield makes unsuitable weather acceptable.
Keep rider clothing and luggage protection separate. A front panel may leave parts of the rider or cargo exposed. The rainwear comparison and seat-bag guide address those tasks. Avoid filling a coverage gap by draping loose fabric across steering or wheels.
Give the supplier the exact trike model, revision, seat, steering configuration, drivetrain, and relevant accessories. A model family may offer several systems with different clearances. A fairing approved for one arrangement should not be generalized to another through a similar frame appearance.
Ask explicitly about any restriction noted in the product material. For example, a maker may identify an incompatible drivetrain option or a required mount. The actual current statement should govern the inquiry. Do not rely on a third-party listing that omits the qualification or summarizes the product as fitting all recumbents.
The drive-layout guide and handlebar-layout guide provide vocabulary for the configuration sheet. If parts have been modified, say so. The installed vehicle, not its original catalog specification, is what the fairing must fit.
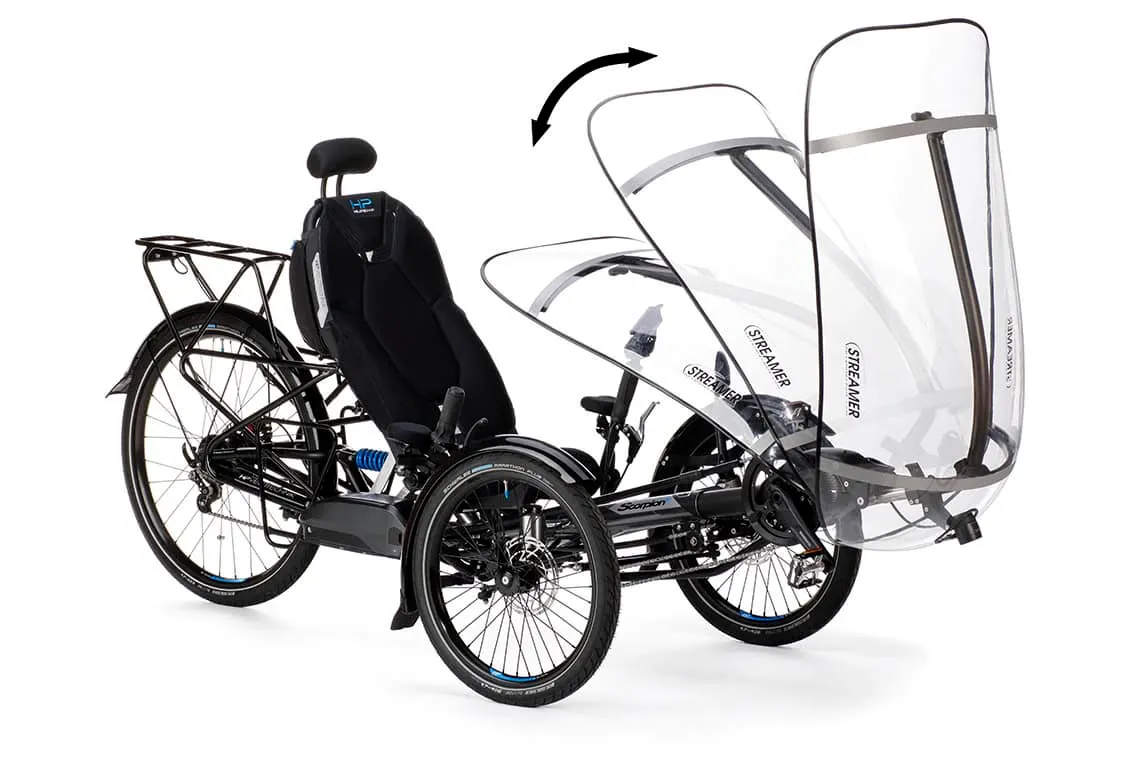
Identify every required bracket, fastener, adapter, and support, along with what is included in the sale. A used panel may be inexpensive while missing model-specific hardware. A retailer photograph may show a complete installed system even when the package contains only part of it. Compare the actual contents with the maker's required list.
Do not substitute clamps or fabricate a bracket without the relevant approval and competent design process. This guide provides no such design. A structure that can be held in place while parked is not established as suitable for riding. Mounting loads and interactions belong to the exact supported system.
Ask who will install the fairing and what checks are included. The service-shop guide helps assess provider capability. An ordinary bicycle workshop may need manufacturer support or model-specific experience. Confirm that before arriving with a large accessory and an incomplete set of instructions.
A fairing can change the route into and out of a recumbent seat. Ask the maker or installer to demonstrate the approved access sequence for the actual configuration. Some systems may have an intended movement or quick-access feature; do not assume every panel can be tilted or used as a handhold.
The mounting guide covers the rider's underlying sequence. The fairing should preserve a usable supported routine rather than requiring the rider to step over an unfamiliar bracket or pull on the shield. If assistance or an adaptation is needed, include an appropriate individual assessment.
Try the access task with normal clothing, helmet, and any ordinary bags in a suitable stationary setting. An empty display model can hide interference from a jacket or seat bag. Record the actual issue and ask about supported adjustments. A product described as convenient does not establish that every rider can use it comfortably.
Follow the vehicle and fairing procedures to assess the intended steering and pedal range. Check hands, controls, knees, feet, cables, and nearby equipment. A straight-ahead gap is not the whole movement. Do not use powered spinning, unstable support, or an improvised road maneuver to investigate a clearance question.
The crank-fit guide provides surrounding fit considerations. Changing the pedal or seat arrangement can affect the relationship with a fairing. Do not move a rider out of a suitable position solely to make an unsupported panel clear. Resolve the complete configuration through the relevant providers.
Loose fabric and straps need separate management. A bag or rain garment that was clear before installation may now settle against another surface or route. The clothing-clearance guide remains relevant. The fairing should not conceal a new contact point near the drivetrain.
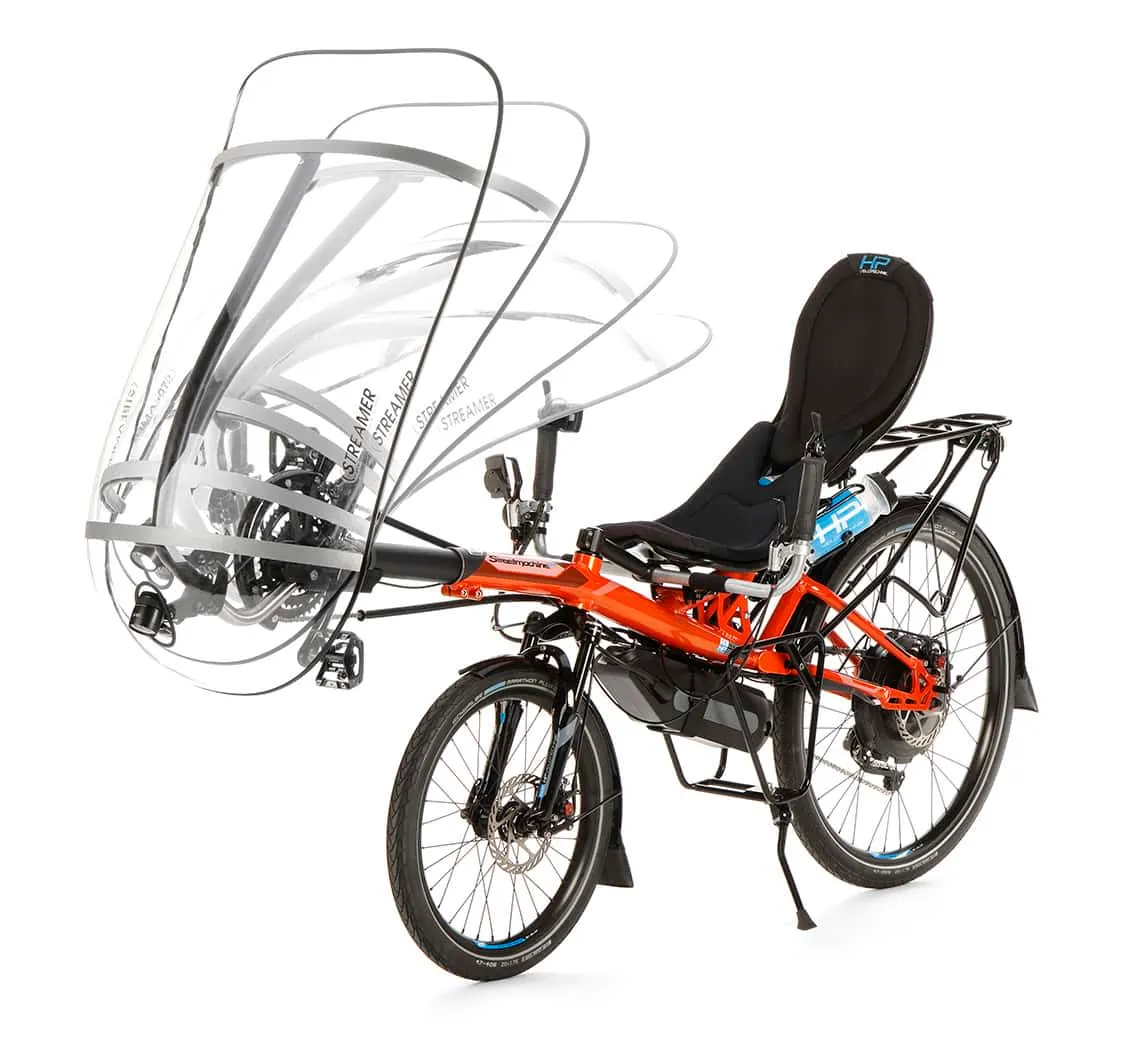
Assess the normal seated view and the observations needed for the route, using the exact installed arrangement. A clear panel's appearance in a product photograph does not establish visibility in every condition. Reflections, moisture, dirt, or damage may require a different response under the product instructions.
This guide does not prescribe a universal look-over or look-through position. Follow the fairing and vehicle makers' guidance and obtain appropriate fitting help where needed. If the rider cannot observe the route adequately, stop and resolve the issue before use. A weather accessory should not require accepting an inadequate view.
Include mirrors, eyewear, and the helmet in the comparison. The mirror guide and eyewear guide address those interactions. A new panel can change where an accessory may be placed, so do not transfer an old mounting assumption automatically.
Check the complete arrangement from front, rear, and sides with ordinary cargo fitted. A fairing or its support can affect the position or view of a light. Use only the maker's supported lighting arrangement and verify current local requirements through official sources where relevant. This article does not certify legal compliance.
The night-light guide and reflector guide explain the separate active and passive layers. A transparent panel is not automatically irrelevant to their operation. The installed system should be assessed rather than assuming that equipment remaining physically present is still correctly arranged.
If the fairing requires a different light mount, identify the exact supported part and installation. Do not attach a lamp to a convenient flexible edge or route its cable across steering movement. Accessory power and mounting remain their own tasks, even when the fairing package appears to provide a complete weather solution.
A fairing changes the complete vehicle, so follow its stated use conditions and the trike maker's requirements. Do not infer that a shield improves every windy situation or makes a difficult route suitable. The wind guide addresses route choice and the option to postpone or end a ride.
Begin any introduction through an appropriate controlled setting and the provider's guidance. A busy road or exposed descent is not the place to learn an unfamiliar arrangement. If handling or control is concerning, stop and obtain assessment rather than treating the change as something to get used to through repeated risky use.
Keep performance claims limited to their evidence. A manufacturer's stated benefit under particular conditions is not a measured result for your rider, load, and route. This guide reports no speed gain, range increase, or stability improvement. The practical purchase question is supported compatibility and usable operation.

Measure the installed outline and identify any approved removal or folding sequence. A fairing can change length, width, height, and access even when the bare trike fits a storage space. The apartment-access guide helps assess successive doors and turns, while the transport guide addresses the broader vehicle task.
Ask whether the normal folding procedure remains available and which parts must be handled first. A removable shield does not mean every support disappears. Record the shape with the hardware actually left in place. Do not force the trike through an old storage routine that no longer fits the complete configuration.
Keep removed parts protected and identified according to their instructions. The panel should not be assumed suitable as a lifting point or tie-down surface. Before riding again, restore the exact supported arrangement and complete the required checks. A panel that looks centered is not proof that every mount is correctly engaged.
Use the cleaning materials and method specified for the fairing material. Do not treat it like ordinary window glass or apply household cleaners without approval. Scratches, clouding, or damage that affects the intended view may require service or replacement. The washing guide covers the trike, not every transparent plastic or coating.
Store the fairing under its documented conditions and inspect mounts and panel condition before use. A protective cover has its own fit and moisture questions. The cover guide explains why covering equipment is not automatically a complete storage solution.
If the shield or mount is damaged, do not keep riding because it remains attached. Obtain the maker's assessment and replacement guidance. A small visible crack or loose connection should not be repaired through an improvised adhesive or extra tie without a supported procedure.
Write the final purchase description around exact vehicle compatibility, fairing generation, mounting kit, installation, rider access, control clearance, visibility, storage, and service support. Keep missing answers visible. A panel-only price is not directly comparable with a complete installed system whose required parts and checks are included.
After installation, retain part references, instructions, and current photographs in the ownership file. Reassess relevant clearances after seat, crank, steering, bag, or lighting changes. The useful outcome is a documented weather accessory that fits the complete routine, not a universal claim that any recumbent can be enclosed through generic hardware.

List the trike model and revision, seat, steering version, drivetrain, fairing generation, required mount, lighting arrangement, and ordinary bags. Add the current documents or written confirmation that connect those items. A fairing panel by itself is not a complete configuration. The worksheet should show which parts are supported together and which questions still need the maker or installer to answer.
Keep the installation and rider-access tasks separate. A provider may establish that the hardware fits while the rider still needs an appropriate fitting session to evaluate entry, controls, and view. Conversely, a rider may like the apparent coverage of an unapproved arrangement. Both mechanical compatibility and usable operation need resolution before the equipment is treated as ready for an ordinary trip.
Consider a buyer comparing a used earlier fairing with a current product. The visible panel may look similar, but the mount, supported drivetrain, access feature, or instructions can differ. The buyer should identify the actual generation and package contents before using the current model's description. A low panel price can become irrelevant if the required supported hardware is missing or no longer suitable for the vehicle.
A second example involves a trike already carrying a side bag and mirror. The fairing may require a different supported accessory position, or it may be incompatible with the intended combination. That question should be resolved in the quote rather than after installation. Do not let one new accessory trigger a chain of improvised clamps and cable routes whose combined behavior has never been assessed.
Include storage and transport in the purchase description. If the fairing must be removed for a home entrance or car journey, identify who performs the approved procedure, where the panel is kept, and what remains attached. The process needs to be practical every time it is required. A product that fits for riding but cannot be stored through a supported routine may not suit the owner's circumstances.
For the view assessment, record the actual seated position and surrounding equipment without claiming an optical test. Note any obstruction, reflection concern, or unclear instruction and obtain the appropriate answer. A clean panel in a bright showroom does not establish visibility in rain, darkness, dirt, or changing light. The rider should retain an early-ending option whenever the actual view becomes inadequate.
Keep the introduction within the maker's instructions and the rider's capability. Do not choose an exposed windy descent to discover how the complete setup feels. If handling changes unexpectedly or a mount is concerning, stop and seek assessment. The fairing's claimed benefits should never be used to dismiss a condition that would otherwise lead the rider to stop.
After installation, update the ownership record and any transport dimensions. Revisit relevant checks after changing the seat, crank, lights, mirror, or bags. Keep the current configuration distinct from old photographs and manuals. The value of the worksheet is not its length; it is the ability to show that the exact installed arrangement, rider routine, and unresolved limitations have been considered together.
Before accepting an installation quote, compare its parts list with the worksheet and current vehicle. Confirm whether the supported light mount, adapters, and necessary checks are included. Resolve any difference before work begins, so the completed system matches the arrangement that the rider and provider actually reviewed.
Research-based buying guide, 15 October 2026. No aerodynamic, weatherproofing, visibility, or hands-on fairing tests were performed.
Guide
Choose your first adult tricycle by checking rider fit, storage, weight limits, gears, brakes, assembly, and service before buying.

Guide
Learn how to compare adult electric tricycles for control, fit, batteries, braking, transport, and ownership support.

Guide
Understand the leg and hip muscles used when pedaling a tricycle, plus how fit, resistance, and electric assistance change the effort.